What is Gateway cloning?
Gateway cloning is a highly efficient alternative to restriction cloning and does not require the use of restriction enzymes. Instead, an insert is moved into a vector through a two-step recombination process that takes advantage of integration and excision reactions using attachment sites attL and attB. The first step—a BP reaction—creates an entry clone containing the DNA insert flanked by two attL sites. The second step—an LR reaction—creates an expression clone containing the DNA insert flanked by two attB sites. Multisite Gateway cloning allows up to four fragments to be inserted simultaneously.
How does Gateway Cloning work?
Gateway cloning is based on the site-specific recombination machinery used by phage (lambda) to integrate its genome into E coli.
The phage lambda, in an attempt to outwit the restriction enzyme defense of bacteria, evolved a lysogenic pathway. In this situation, the phage uses site-specific recombination to integrate itself into the bacterial genome and hide from the restriction enzyme defense mechanism. The enzymes used by phage lambda, to integrate and excise itself, are the basis of Gateway cloning.
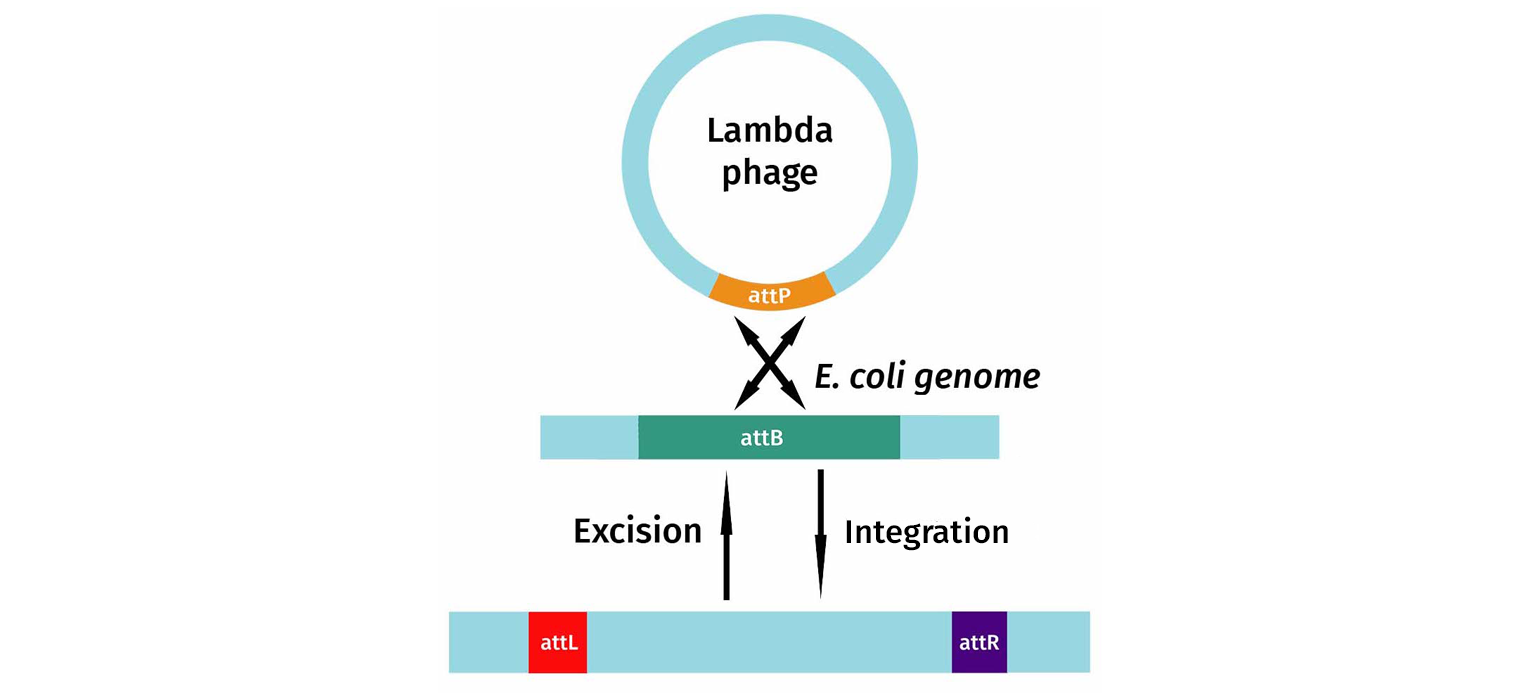
In this diagram, you can see that the integration system involves the specific DNA sequences found on the phage, attP-sites, as well as sites found on the bacterial genomic target, attB. Recombination between the B and P elements results in new recombination sequences flanking the inserted phage DNA. After insertion, the recombination sequences are now called attL (left) and attR (right).
If the phage senses that the bacteria is under stress, it will excise itself. Upon excision, attL and attR are converted back to attP and attB, and the phage DNA is removed from the bacterial chromosome. The phage then begins its lytic growth cycle.
The Gateway system uses both the integration and excision reactions to create an alternative to restriction enzyme cloning. Since Gateway Cloning is moving elements from one plasmid to another, they do not refer to integration and excision, but rather the BP reaction (BP→ LR) and the LR reaction (LR→ BP). These two recombination events are perpetually reversible.
Designing a Gateway Cloning Experiment
Gateway cloning proceeds in two steps:
- Creation of Entry Clones - BP Reaction
- Creation of Expression Clones - LR Reaction
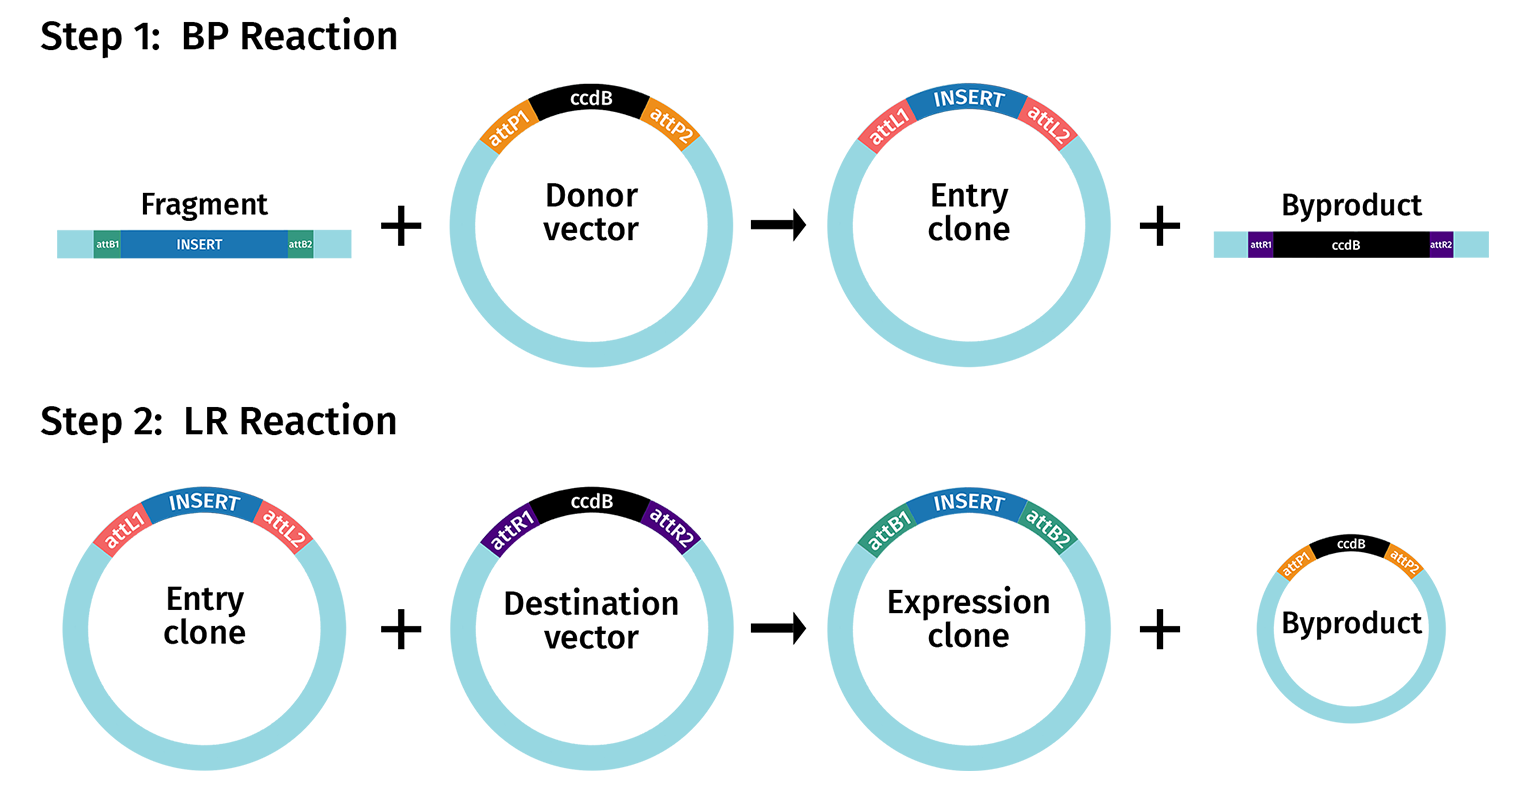
Entry clones contain a single fragment of interest that is located between attL sites.
Expression clones contain either a single fragment of interest in a Destination vector created using standard Gateway cloning, or 2 to 4 fragments of interest created using multisite Gateway cloning.
Creating Entry Clones

Entry Vectors and Donor Vectors are used to capture a gene or gene fragment of interest, to create an Entry Clone. An entry clone is a plasmid carrying a fragment of interest located between attL sites.
Entry vectors depend on conventional restriction enzyme cloning to introduce your fragment of interest between the attL sites.
In contrast, Donor vectors require you to use PCR to add attB sites to your fragment of interest then use the Gateway BP Clonase reaction.
The product you generate with your Entry Vector or Donor vector is an Entry Clone i.e. your fragment of interest is now located between attL sites, and ready for subsequent Gateway Reactions.
Positive and Negative Selection
Gateway cloning takes advantage of both positive and negative selection during the process of propagating vectors and selecting for recombinant plasmids.
For instance, the Donor Vector pDONR201 contains multiple genes for selection including:
- A Kanamycin resistance gene which will positively select for the presence of the plasmid
- A ccdB gene, which is a suicide gene and will kill any bacteria that hosts it
Following the BP reaction, which introduces your fragment of interest between the attP sites, all plasmids transformed will be able to survive Kanamycin selection, but only recombinants, which have lost the ccdB gene will be able to grow.
The same pattern of positive and negative selection is used after performing LR clonase reactions to create your Expression clone. In this case, the plasmid is positively selected for with Ampicillin. The same ccdB gene provides negative selection against intact destination vectors.
The ccdB gene and associated chloramphenicol gene are a universal feature of all Gateway vectors. You can create your own Destination Vectors by adding a complete Gateway Cassette, which includes att sites and the selectable markers, into an expression vector of your choice.
Cloning Options
You have a choice of three molecular approaches to create your Entry Clones.
1. Restriction enzyme cloning into an Entry Vector, such as pENTR1A. Two small multicloning sites are located inside each attL site allowing standard restriction cloning reactions to be carried out.
► Learn more about restriction enzyme cloning

2. BP Clonase reaction into a Donor Vector. Several DONR vectors exist which allow you to create an entry clone using BP clonase. To do this you need to create PCR primers with tails on them which add the required attB sites to your fragment of interest.

3. TOPO cloning into a pENTR plasmid. Several Gateway vectors allow direct capture of a PCR product by TOPO cloning either by directional TOPO or TOPO TA cloning. All vectors allow you to quickly create an entry clone, which includes attL1 and attL2, often using primers you already have on hand.
► Learn more about TOPO cloning

Creating Expression Clones
Entry Clones are transferred to Destination Vectors using the Gateway LR Clonase reaction to create an Expression Clone for use in experiments. There are numerous Destination Vectors pre-engineered for specific experimental applications. Once you have a sequence-verified entry clone, you can transfer it to multiple destination vectors.
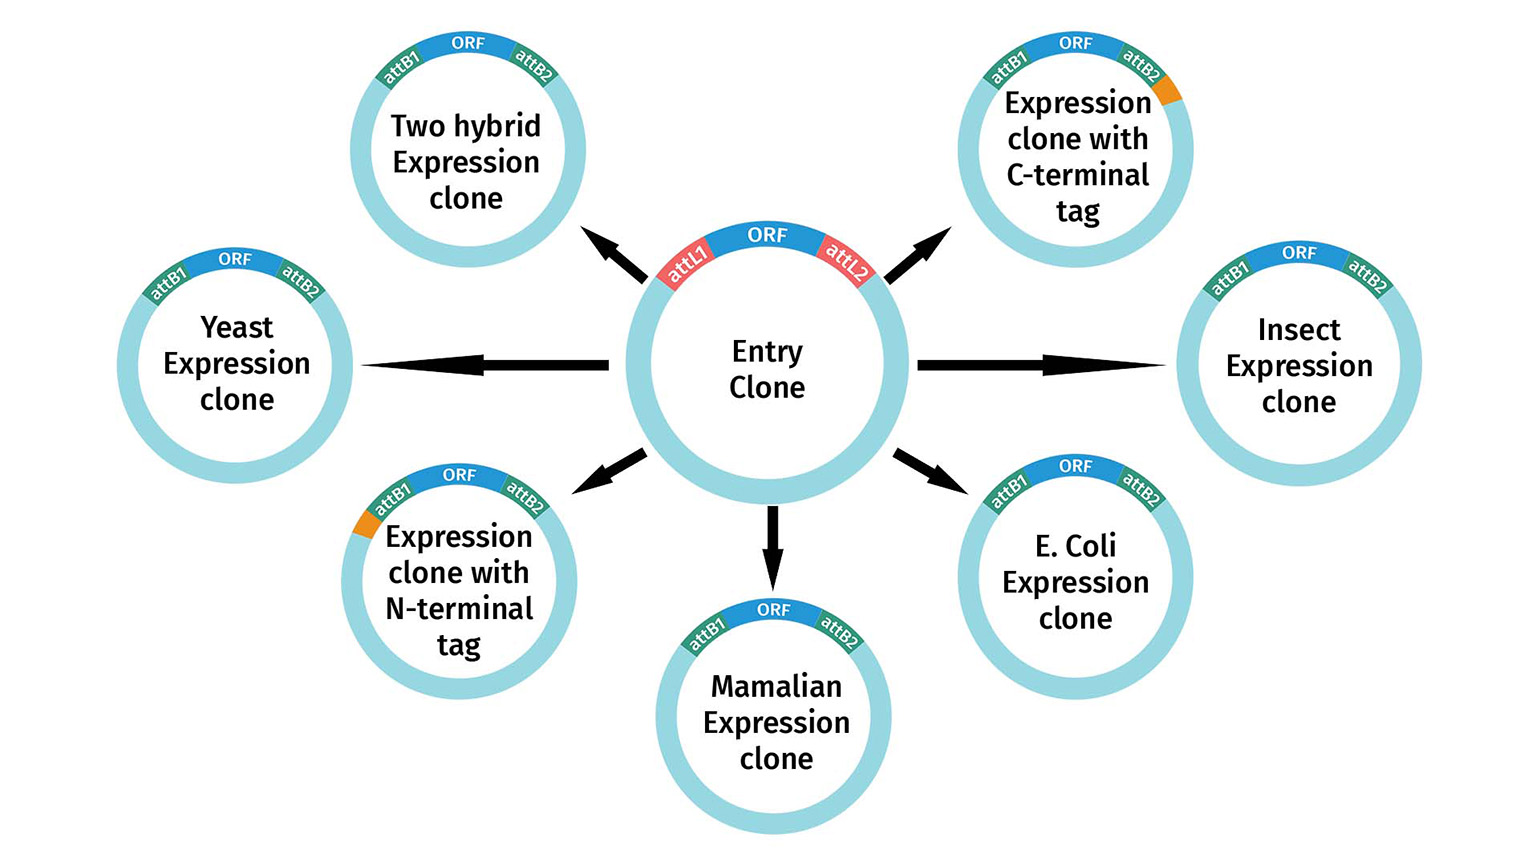
If your expression clone requires the transfer of only one fragment of interest into a destination vector, it is considered standard Gateway cloning. You may also use multisite Gateway cloning to assemble multiple fragments in a single destination vector. Multiple destination vectors exist, which are engineered to achieve a wide variety of experimental goals in all common model systems, ranging from protein expression, localization, two-hybrid screening, and RNAi.
All of these destination vectors include attR1 and attR2 and are therefore compatible with standard Gateway Entry clones, whether they are made by restriction enzyme cloning, BP clonase, or TOPO cloning. In addition, numerous collections exist which contain thousands of sequenced cDNAs located between attL1 and attL2.
Multisite Gateway Cloning
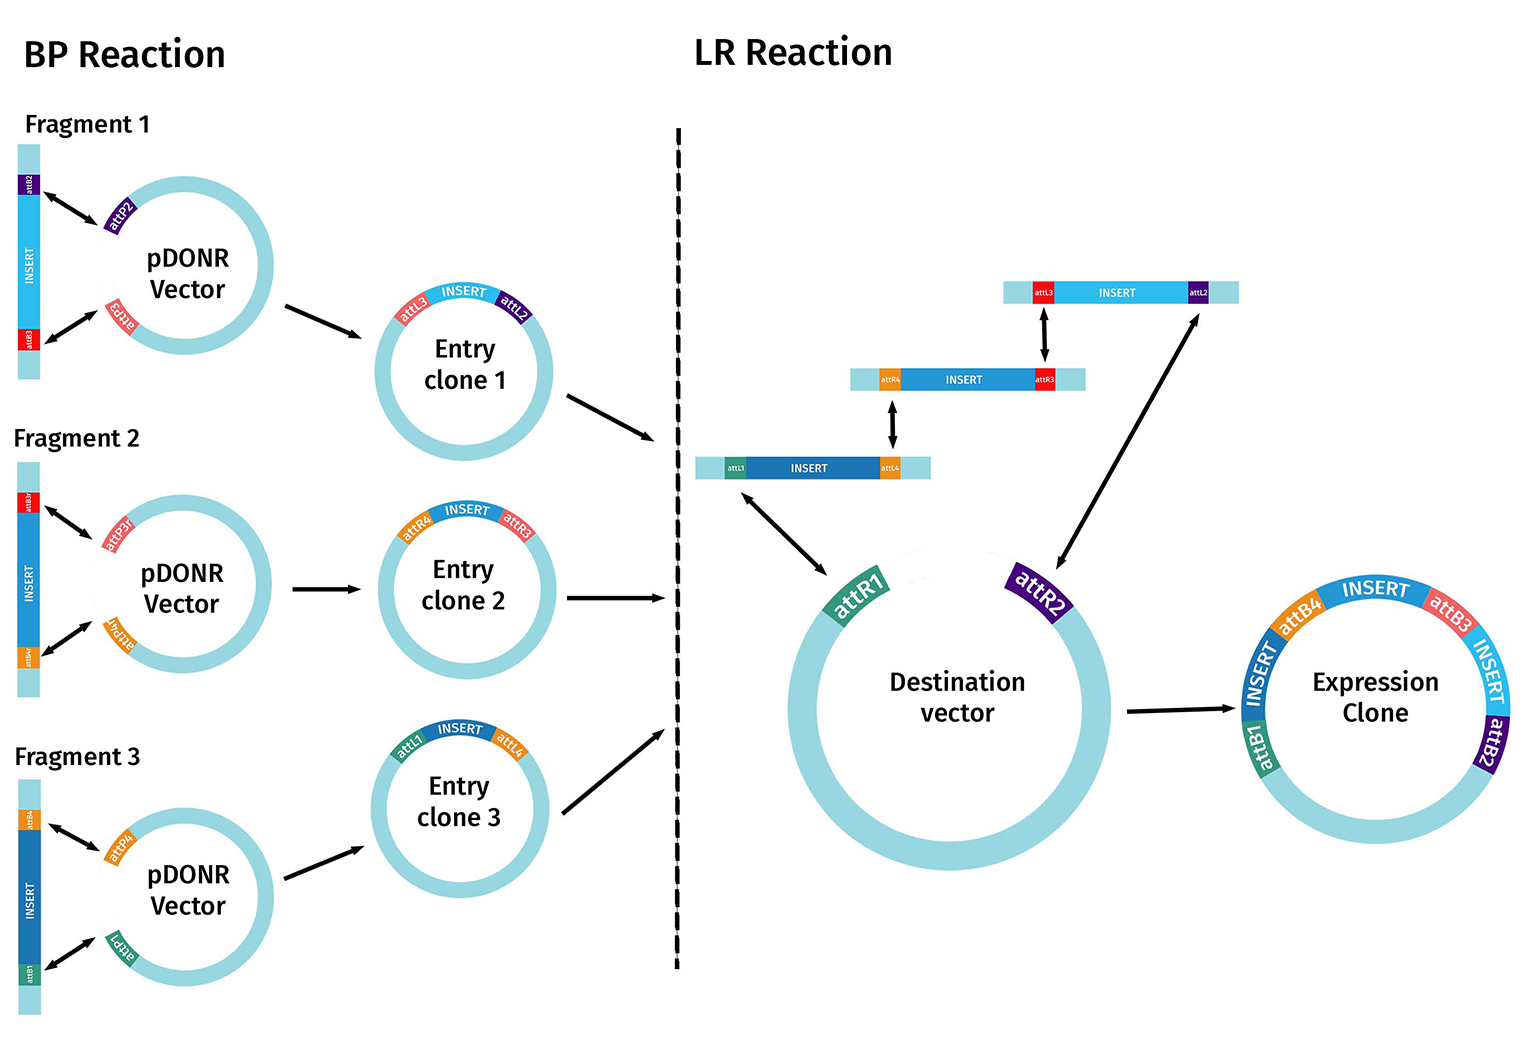
Multisite Gateway cloning can assemble multiple fragments into a single destination vector. Unlike standard Gateway cloning, multisite Gateway cloning utilizes the site-specificity of four different att sites to recombine multiple fragments into a single construct in one step.
The first step starts with the BP reaction. In this case, multiple DNA fragments of interest are created that contain different pairs of flanking attB sites. To perform multisite Gateway cloning effectively, you need to plan how many fragments you wish to combine and in which order before choosing the correct Entry and Destination Vectors.
Each Entry Clone is built and sequence-verified separately, following the standard gateway cloning methods. These entry clones are used in the LR reaction.
The corresponding att sites on the Entry Clones and the Destination Vector must align correctly. The compatible flanking sequences are then recombined and incorporated into the desired destination vector to create the final expression clone containing the multiple DNA fragments of interest.
Gateway Cloning: Top 5 Tips
1. Buy it
Gateway is a high throughput method for cloning, vis a vis, it is FAST. Before cloning your own reagent, you might be able to save time by finding it in one of the many well-characterized collections.
2. Use SnapGene to verify that proteins are in-frame
Gateway Cloning is frequently used when building clones for expression in vivo or in vitro. These clones will often include a protein tag for subcellular targeting, visualization or purification.
Double-check that start and stop codons are located correctly, and the correct reading frame is maintained in your designed construct by translating the predicted proteins in SnapGene.
3. Pay attention to quantities
All Gateway protocols clearly specify that molar ratios are important for successful Gateway reactions.
Purchased Gateway Donor vectors are provided at 150 ng/ul, which is equivalent to roughly 50 femtomoles/ul. The recommended molar ratio is 1:1.
The product literature provides a useful equation for mass to molarity conversion, but there are plenty of biocalculators on the web to choose from. The general molar ratio guidelines are as follows:
Entry Clones:
- pDONR to PCR insert 1 to 1 molar ratio (~50 femtomoles each)
Expression Clones
- Single fragment Gateway
- Expression vector to Entry Clone: 1 to 1 molar ratio (~20 femtomoles each)
- Multi Fragment Gateway
- Expression vector 20 femtomoles
- Each Entry Clone 10 femtomoles
4. Pay attention to time
While Cloning
- TOPO TA cloning, while not officially a Gateway enzyme, is a handy way to create an Entry Clone. TOPO cloning takes the least time, being complete in as little as five minutes.
- BP clonase is recommended to incubate for 1 hour. If you are getting poor yields, consider extending the time.
- LR clonase can take longer, particularly if you are performing multisite Gateway cloning. You can allow these reactions to incubate overnight to improve cloning efficiency.
After Cloning
If you find that you are observing a significant proportion of background colonies after LR reactions, consider shortening the length of your post-transformation incubation. The escape from negative selection is powerful. If the ccdB gene acquires a mutation, you will observe the growth of clones that do not carry insert. Since ampicillin is bacteriostatic you do not require full expression of the ampicillin gene prior to plating.
5. Combine BP and LR reactions
When cloning a PCR product for Gateway expression you can save time and money if you skip the transformation and isolation steps after your BP clonase reaction to create your Entry Clone.
- Combine the attB modified PCR product with pDONR and your chosen expression vector.
- Incorporate both BP clonase and LR clonase.
- Select for ampicillin resistance to select for LR clonase recombinants.
For details see this protocol from Thermo Fisher Scientific.
However, be mindful. If you plan on testing your gene in more than one destination vector, you might be better off creating and sequence verifying your entry clone. This will guarantee that related experiments are based on the same clone.
Pros & Cons of Gateway Cloning
What are the main strengths of Gateway cloning?
The BP and LR clonase recombination technology used in Gateway cloning is distinct among the variety of cloning techniques now available and has many advantages:
- Large libraries of cloned and sequenced gene fragments are available for purchase.
- Gateway cloning is high throughput. The same LR reaction can be applied to a single clone of interest, to easily transfer it to pre-configured destination vectors that allow you to ask common experimental questions.
- Gateway cloning allows you to re-use your sequence validated fragment of interest in multiple experiments, without additional sequence verification.
- Multisite Gateway technology allows you to quickly test different gene fragments in different combinations
What are the main limitations of Gateway cloning?
There are a couple of major disadvantages to using Gateway Cloning:
- Large scars are left in your molecular constructs. For simple applications of single fragment Gateway cloning, the scars have little impact. In multisite Gateway constructs, the scars can have potential undesired effects on experimental outcomes.
- Gateway cloning has high barriers to entry. Gateway cloning can be more difficult to master than other techniques. In addition, you may need to make several Gateway compatible entry clones until you can fully take advantage of the system
Gateway Cloning in SnapGene
SnapGene allows you to accurately design and simulate Gateway cloning procedures. The simple interface and specialized tools ensure fast, accurate construct design:
- Simulate restriction cloning, TOPO cloning, and BP cloning reactions
- Automatically design primers and add correct attB sites to your primers to match your selected pDONR vector
- View your entry clones and expression clones and check the reading frame and any design flaws.
Recommended Resources
