Introduction to Gibson Assembly
This technique is named for its creator Daniel Gibson, who first published the method in Nature Methods, 2009. The technique was presented to create exceptionally large molecular clones in vitro. Since its inception, Gibson assembly has proven to be a robust technique that, with slight modification, is suited for combining both long and short fragments.
Similar to other advanced cloning techniques, Gibson assembly is based on assembling overlapping PCR products.
Following the trend developing in more recent technologies, multiple enzyme activities are designed to work together in vitro. In Gibson assembly, the active enzymes are T5 exonuclease, Phusion polymerase and Taq ligase.

These enzymes work together to fuse overlapping DNA fragments.
T5 exonuclease chews back the 5’ end of double-stranded DNA to expose engineered overlaps. Polymerase begins filling in at the overhangs preventing excessive enzyme chewing. When stable compatible overhangs anneal, ligase completes the fusion of the DNA fragments. Once ligated, the DNA is protected from the exonuclease.
The reaction is designed to occur at 50°C, with all enzymes selected for their stability and activity at this temperature.
The classic Gibson Assembly reaction can result in errors at fragment junctions and does not work with single-stranded fragments or short fragments. Second-generation assembly reactions such as HiFi Assembly and Gibson Assembly Ultra improve on these limitations. This article refers to all these reactions generically as Gibson Assembly.
Gibson Assembly Details
To perform Gibson assembly, you will need to prepare one or more inserts and your vector. Insert fragments are always prepared by PCR. You have the option to prepare your vector by linearizing your plasmid with restriction enzymes or by using Reverse PCR.
► Learn to simulate Gibson Assembly in SnapGene
Insert Preparation
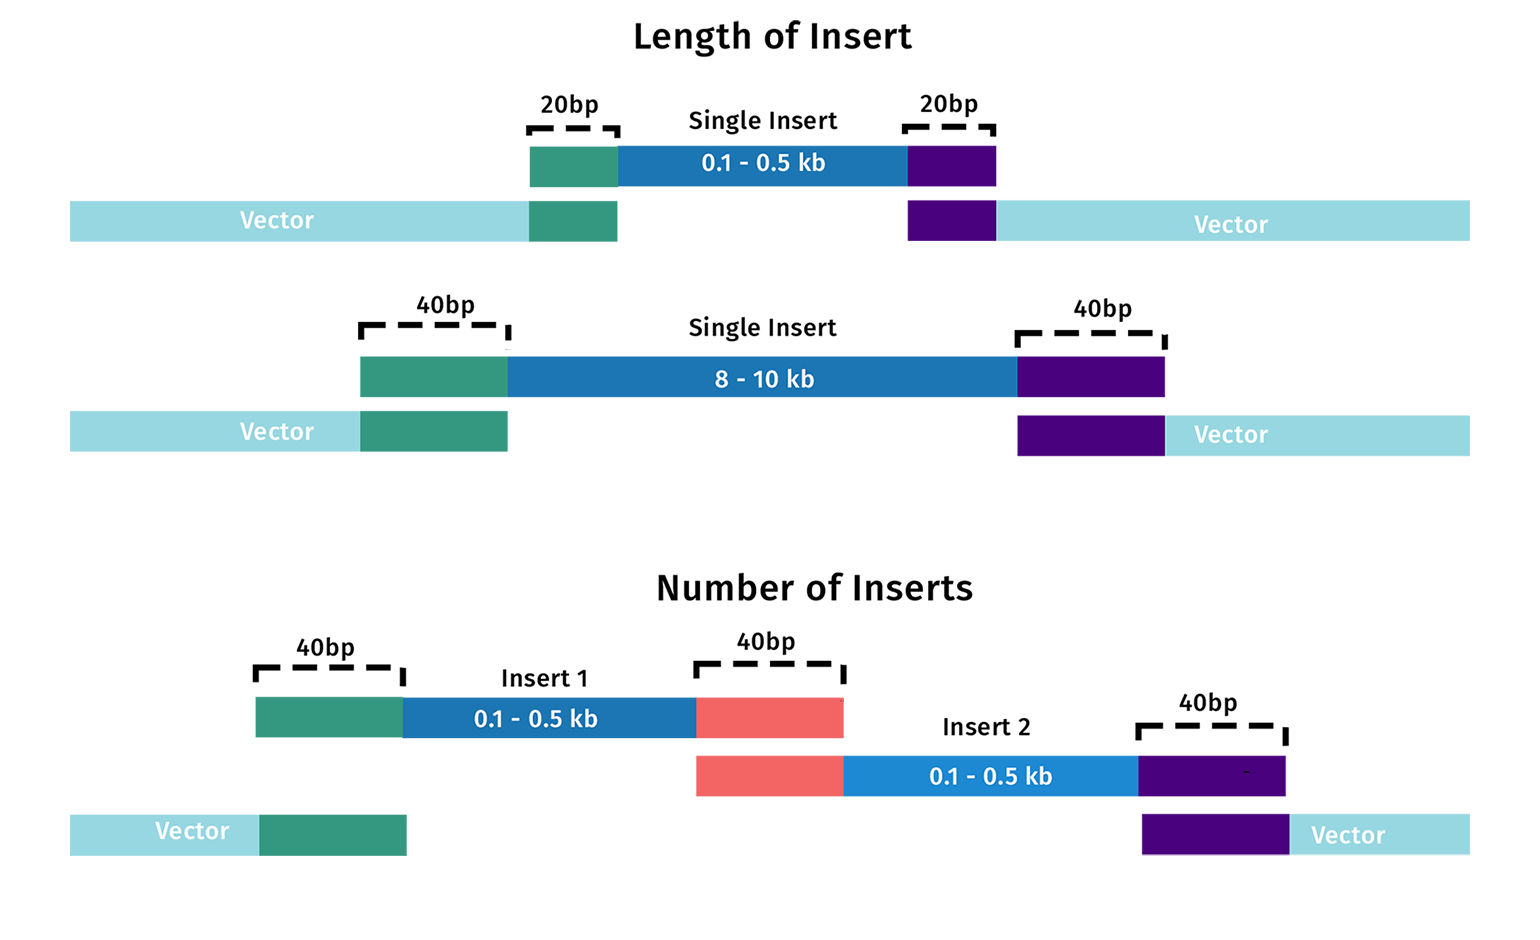
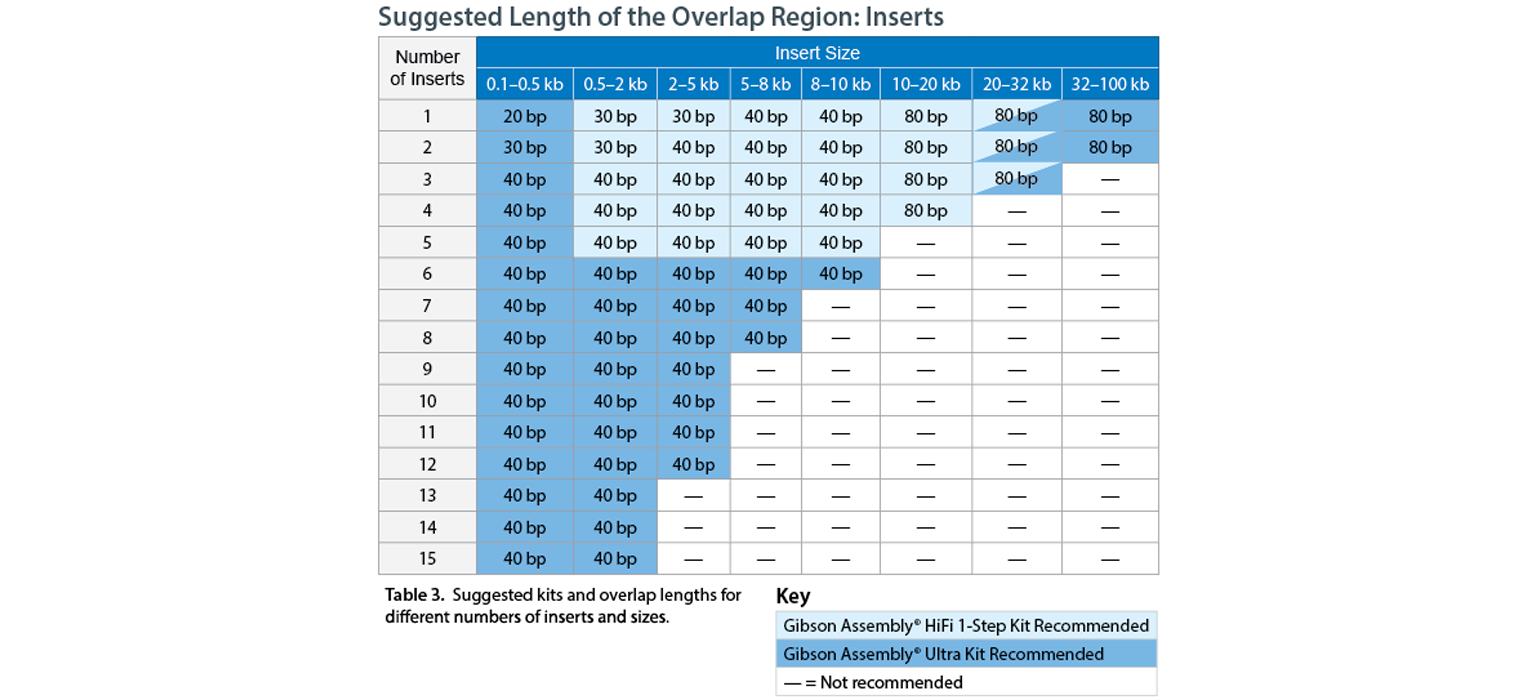
PCR primers need to be designed to amplify your fragment of interest and include 20 or more base pairs of homology to the vector or adjacent fragments in your cloned product. The length of the homologous ends depends on the number of fragments being assembled and their length (see below).
When designing your cloning project, you can imagine that your primers have two distinct components, the target-specific primer for amplification and the 5’ tail that will create the overlap between the vector or adjacent fragments.

The target-specific part of the primer should meet standard PCR primer criteria, including composition and melting temperature.
While standard Gibson assembly does not work with short single-stranded DNA inserts, the closely related technique HiFi Assembly does. This allows you to have short fragments of interest synthesized. These fragments are then easily introduced into your desired vector.

Vector Preparation
Restriction Enzyme Digestion
Vectors may be prepared for cloning using restriction enzyme digestion with one or more enzymes. Ideally, the linearized vector fragment should be gel purified to separate the linear vector from any remaining uncut vector, which would contribute to background colonies. This will also eliminate the residual fragment from the multi-cloning site, if two enzymes are used.
Inverse PCR
Linearized vectors may also be generated using Inverse PCR, where primers are selected that will amplify the backbone of your chosen cloning vector. After amplification, the PCR product should be cleaned with a PCR clean-up column and be treated with DpnI to eliminate residual uncut plasmid template.

Gibson Assembly Reagents
There are multiple Gibson Assembly reagents on the market. They have been optimized by different manufacturers generally either for improving fidelity at fragment junctions or for the creation of large constructs with multiple inserts. Some of the products are summarized here.

Gibson Assembly Cloning Top Tips
1. Gibson Assembly Primer Design
Depending on your overall cloning strategy, you can add tails to just the insert fragment(s) or the vector. You can use one preparation of a purified vector with multiple inserts by adding homologous ends to the insert primers. This is particularly applicable when linearizing the vector with restriction enzymes.

The length of the homologous tails depends on both the size of the inserts and the number of inserts being incorporated. There are a few general rules for primer design:
- For simple Gibson assembly reactions, overlapping tails from 15 to 30 nucleotides are sufficient. Overlaps need to anneal efficiently at the reaction temperature of 50°C.
- As your fragment length increases, you should increase the length of the overlapping tail.
- As you increase the number of fragments in your assembly, you should increase the length of the overlapping tail.
This chart adapted from CODEX cloning outlines how these variables should affect the length of the overlaps between your fragments. Consult specific manufacturers when planning your assembly reaction.

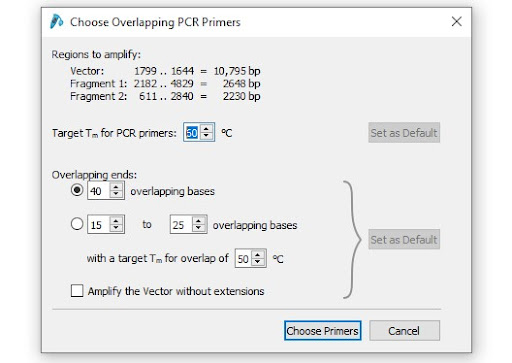
The SnapGene tools for Gibson Assembly and NEB HiFi Assembler allow you to customize the size of your homologous overlaps. You can indicate the specific length or specify the melting temperature.

2. Quantitation
After amplification, check your PCR products on an agarose gel. If only your expected PCR product is present, you can purify the PCR product away from primers, dNTP’s and residual enzyme with a PCR clean-up column. If additional bands are present, you should purify your insert from an agarose gel. Determine the concentration with UV spectroscopy.
Suggested molar ratios of fragments to inserts are dependent on the size of the fragments and how many fragments are being assembled. Consult specific manufacturers for their guidelines.
3. Reaction Kinetics
Gibson assembly results in covalently sealed molecules in vitro. Simple assembly reactions are complete in 15 minutes. Reactions involving 4 or more fragments and/or exceptionally long fragments should be incubated for one hour or longer. To improve cloning efficiency, you can extend the reaction time to greater than one hour.
4. Reducing Background Colonies
When using restriction enzymes to linearize your vector, uncut plasmid can result in background colonies. You can eliminate this by band purifying your cut vector. Alternatively, you can use inverse PCR to prepare your linear vector. In this case, you can either band purify the resulting product or eliminate uncut template plasmid with the restriction enzyme DpnI.
Gibson Assembly Pros & Cons
Gibson Assembly Pros
As one of several synthetic biology assembly techniques, Gibson assembly is a sequence-independent and seamless cloning technique.
- The use of PCR means that reliance on conveniently located restriction enzymes is eliminated.
- NON-restriction and ligation cloning technology allow the direct fusion of desired fragments.
- Gibson assembly is a one-pot assembly technique for as many as 15 separate fragments.
- Finally, the technique is fast compared to traditional restriction enzyme cloning. The difference in speed is magnified when using Gibson assembly to clone multiple fragments at one time.
Gibson Assembly Cons
Gibson assembly has a few limitations.
- Gibson Assembly Master Mixes are relatively expensive commercial products but are available from multiple sources.
- Basic Gibson Assembly can introduce errors at fragment junctions. However, related Gibson assembly reagents, such as HiFi Assembly and Gibson Assembly Ultra correct this problem.
- The relatively long regions of homology required for some Gibson assembly reactions will be more prone to secondary structure, which potentially interfere with successful outcomes.
- Like any PCR-based cloning technique, sequence verification of your final clone is absolutely required.
SnapGene User Guides
► Gibson Assembly
Step-by-step instructions for Gibson Assembly with SnapGene
► NEBuilder HiFi Assembly
Step-by-step instructions for NEBuilder HiFi Assembly with SnapGene
Additional Resources
Recommended Resources


