Introduction to CRISPR in SnapGene
Genome editing technology has been evolving for many years. The Holy Grail of genome engineering has always been to introduce a specific genetic change that affects only the genomic target and leaves no undesired changes in the DNA. The discovery and application of the bacterial defense system known as CRISPR made this type of genome modification relatively fast and easy.
CRISPR technology is finding broad applications in experimental biology, as well as providing the opportunity to treat genetic diseases.
As discussed in this article, all CRISPR experiments require a guide RNA (gRNA) and many CRISPR experiments require a repair template. Integrating CRISPR reagents into your existing SnapGene files allows you to exploit many of SnapGene’s design, modeling and prediction capabilities as you proceed through your experiment.
CRISPR technology is versatile and constantly evolving. Bacterial CRISPR effector proteins have been expressed in a wide variety of organisms and CRISPR technology is being explored to treat diseases ranging from cancers to viral infections.
Examples include:
- Developing plants resistant to disease and climate
- Multiple experimental model systems, both traditional and novel
- Successful treatment of sickle cell anemia
There are two principal limitations of CRISPR. The first is the accuracy of the technique or the potential of damage to “off-targets”. Several factors can impact how accurately the gRNA directs CRISPR effector protein cleavage. Because gRNAs are 20 nucleotides long, the potential off-targets are limited to closely related sequences, hence off-site cleavage is relatively predictable and potentially avoidable. Also, several groups have developed Cas9 variants with less off-target activity.
The other significant limitation to CRISPR is the delivery of the CRISPR reagents to cells. This limitation is more pronounced in complex eukaryotic systems and in therapeutics, where delivery needs to be optimized to certain cell types while minimizing potential toxic side effects.
What is CRISPR?
CRISPR (Clustered Regularly Interspaced Short Palindromic Repeats) is an adaptive molecular defense mechanism that was first characterized in 2008. CRISPR Loci allow the many bacteria which contain these gene clusters to adaptively and selectively target invading viral pathogens. In most bacteria, 4 to 6 genes are required for the complete defense mechanism. The component of the mechanism that ultimately targets the cleavage of the invading viral genome is frequently determined by a single gene. The gene that has been the most fully characterized and exploited is the Cas9 endonuclease from the bacterium, Streptococcus pyogenes (SpCas9).
Cas9 and related effector proteins allow researchers to essentially make custom restriction enzymes. This is done by targeting the double-stranded cleavage of Cas9 endonuclease by the inclusion of a gRNA. After successful cleavage, natural DNA repair processes are activated.
Hence, all CRISPR experiments are based on a two-step process.
Step 1. Targeted Genome Cleavage
The targeted genome cleavage is achieved by targeting sequence-specific cleavage of S. pyogenes Cas9 endonuclease with a gRNA. In order for the gRNA to successfully direct Cas9 cleavage, the corresponding target DNA sequence in the genome must be found next to a PAM site, also known as a Protospacer Adjacent Motif.
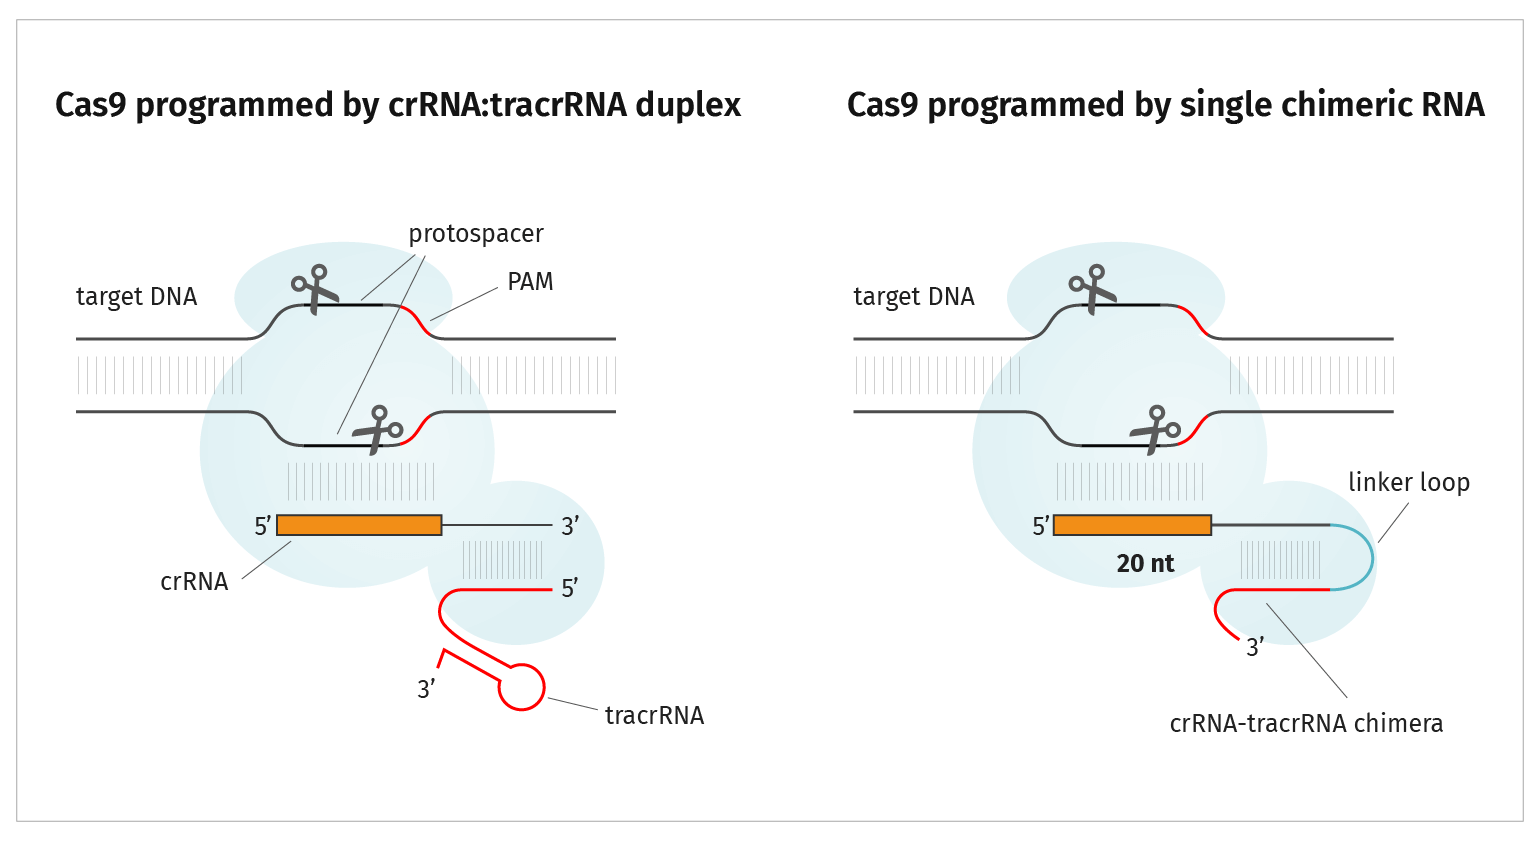
Cas9 Endonuclease
Active Cas9 endonuclease is a ribonucleoprotein composed of three subunits:
- Cas9 protein
- crRNA 20 nucleotide CRISPR RNA, referred to as guide RNA or gRNA, sequence specifically targets cleavage
- tracrRNA (transactivating CRISPR RNA) transactivates Cas9, inducing a conformational change allowing crRNA to bind and the complex to subsequently be an active endonuclease
The gRNA and tracrRNA can be provided separately as described above. Alternatively, you can design a single guide RNA, or sgRNA, which includes the gRNA sequence and tracrRNA sequence in one molecule.
Step 2. DNA Repair
In intact cells, DNA damage is immediately subject to repair, either un-templated DNA repair or templated DNA repair.
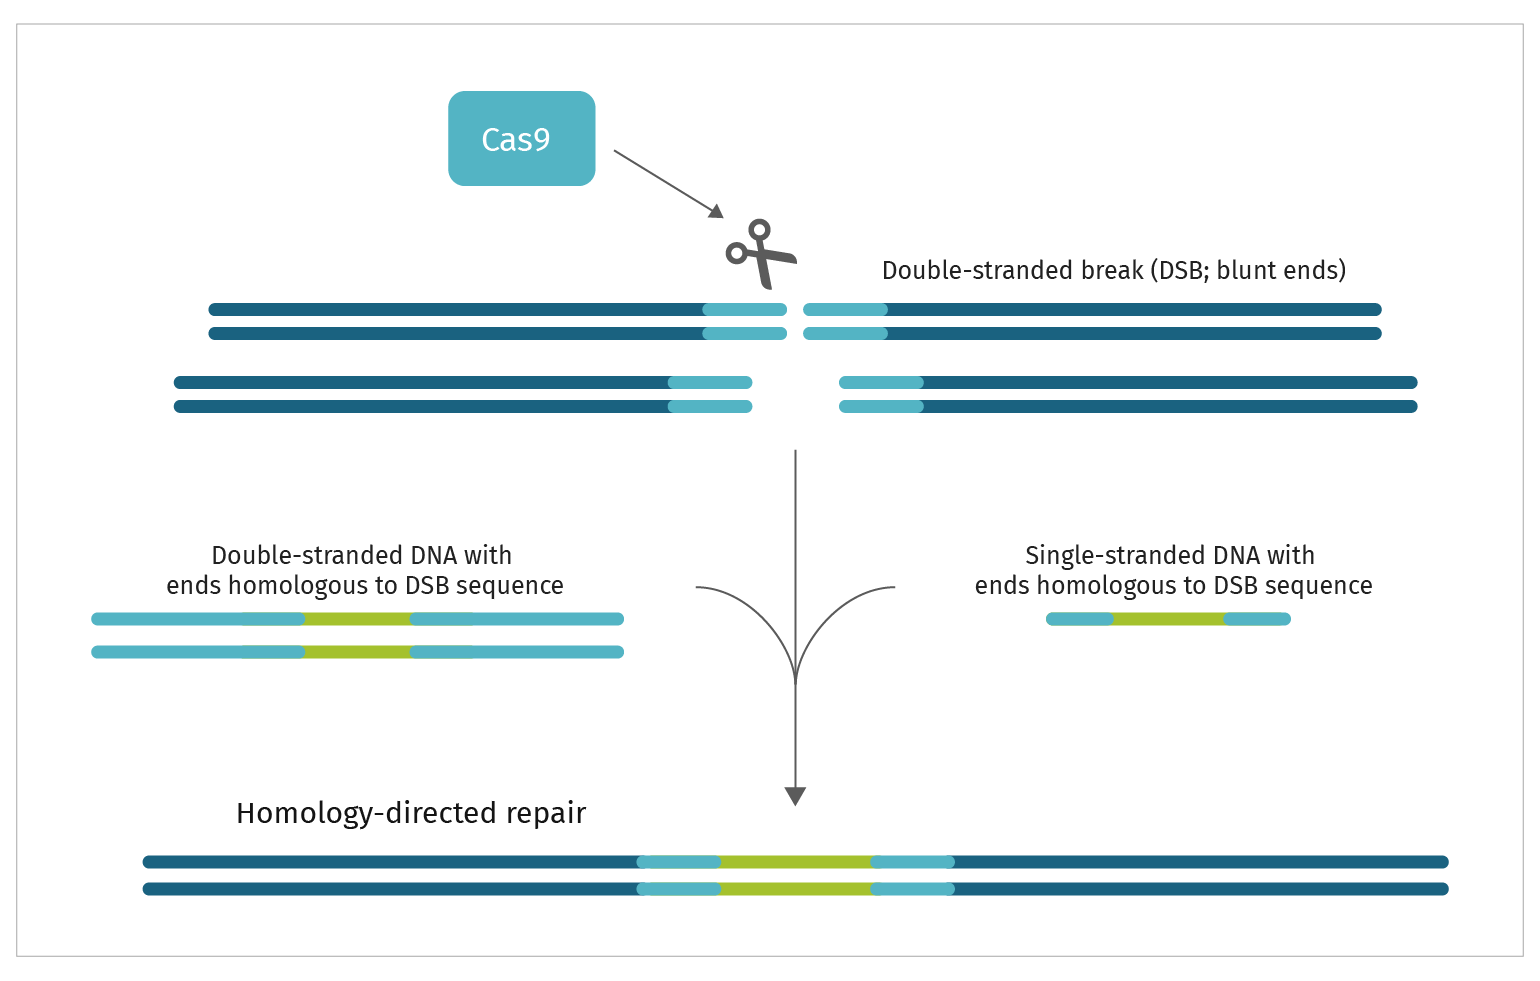
The presence or absence of a repair template determines which repair mechanism is activated. An untemplated repair event is achieved by Non-Homologous End Joining (NHEJ). You may choose an un-templated genome edit if you want to simply disrupt the coding region of a gene. If your goal is to insert larger or smaller gene fragments or introduce a very specific genetic change, then you would build a repair template that meets your needs. These larger or more precise repair templates depend on Homology Directed Repair (HDR) to be introduced into the genome.
CRISPR Protocol
The following steps outline what is required to perform CRISPR in a generic experimental system. These steps are based on using standard Streptococcus pyogenes Cas9 (SpCas9).
- Decide on what type of genome edit you want.
- Untemplated Repair: For an un-templated edit, you do not require a repair template. This strategy is used for simple gene disruptions.
- Templated Repair: Depending on the extent of your desired genome edit, you can synthesize the repair template of single or double-stranded DNA. Alternatively, you can molecularly clone your repair template.
- Identify gRNA sequences. You can use SnapGene for this part of the process.
- Design and build your repair template. SnapGene can be used to design the repair template. The template can be built with standard molecular cloning techniques or ordered as a synthesized DNA fragment.
- Deliver your CRISPR mix to your system, based on best practices for that system. This can range from micro-injection to any type of transformation.
- Verify your successful genome edit.
Using SnapGene in your CRISPR experiment
Two distinct molecular reagents need to be designed to complete a CRISPR experiment, a gRNA and a repair template. The advantage of using SnapGene to design your reagents is that you can easily take into account annotated features you have developed for your system and the corresponding reagents you have developed in your lab.
- The gRNA: The role of the gRNA is to target Cas9 cleavage. Depending on the specifics of your experiment, you may want to use an online gRNA design tool that will search a relatively large sequence for candidate gRNAs and score them. If however, your experiment is more constrained to a small genomic target, you can design your gRNA using SnapGene.
- The repair template: SnapGene allows you to directly edit your DNA sequences and predict the effects of that edit on protein translation. In addition, you can see how your genome edit relates to your existing PCR and sequencing reagents, or identify new reagents that will allow you to verify your successful genome edit.
SnapGene and gRNA design
Once you have determined the genome edit that you want to introduce, do the following:
- Identify PAM sites at or near the site of your desired edit.
- Find sites by using the Control-F function and entering NGG. All PAM sites on both strands will be highlighted. NGG is defined to match the convention 5’NGG3’.
- Convert any NGGs that suit your experiment to a feature named PAM site.
- Define your target sequence.
- Identify the 20 nucleotides 5’ to your PAM site. These nucleotides define your guide RNA. Use the SnapGene Primer function to label these sequences. This will automatically indicate the orientation.
- Optional: indicate the Cas9 cleavage site which is 3 nucleotides inside of the PAM sequence, within the target sequence.
- Test your candidate gRNA for specificity and efficiency.
- Obtain your gRNA.
- You may order a fully synthesized gRNA from one of many companies. These companies will provide you with details on how to convert your DNA sequence to create the correct gRNA or sgRNA.
- You may choose to inducibly express your gRNA from a CRISPR plasmid. This can easily be done with Gibson Assembly or In-Fusion Cloning. You can find gRNA expression plasmids at Addgene.
CRISPR Repair Template
There are two steps to a CRISPR repair template.
Step 1. Define your genome edit
SnapGene allows you to easily edit your DNA sequence to define your edit, in the context of all the annotated information you have already attached to your DNA file. This is readily done through the Edit Menu or the Top Toolbar which gives you direct access to the most frequently used editing tools.
In addition, you can test the impact of your genome edit on protein expression using the protein translation tools which can be accessed from the View Menu, or the Side Toolbar.
Step 2. Obtain your repair template
Depending on the location and size of your genome edit you will need to decide on what type of repair template to design.
Genome edits < 200 nucleotides in length.
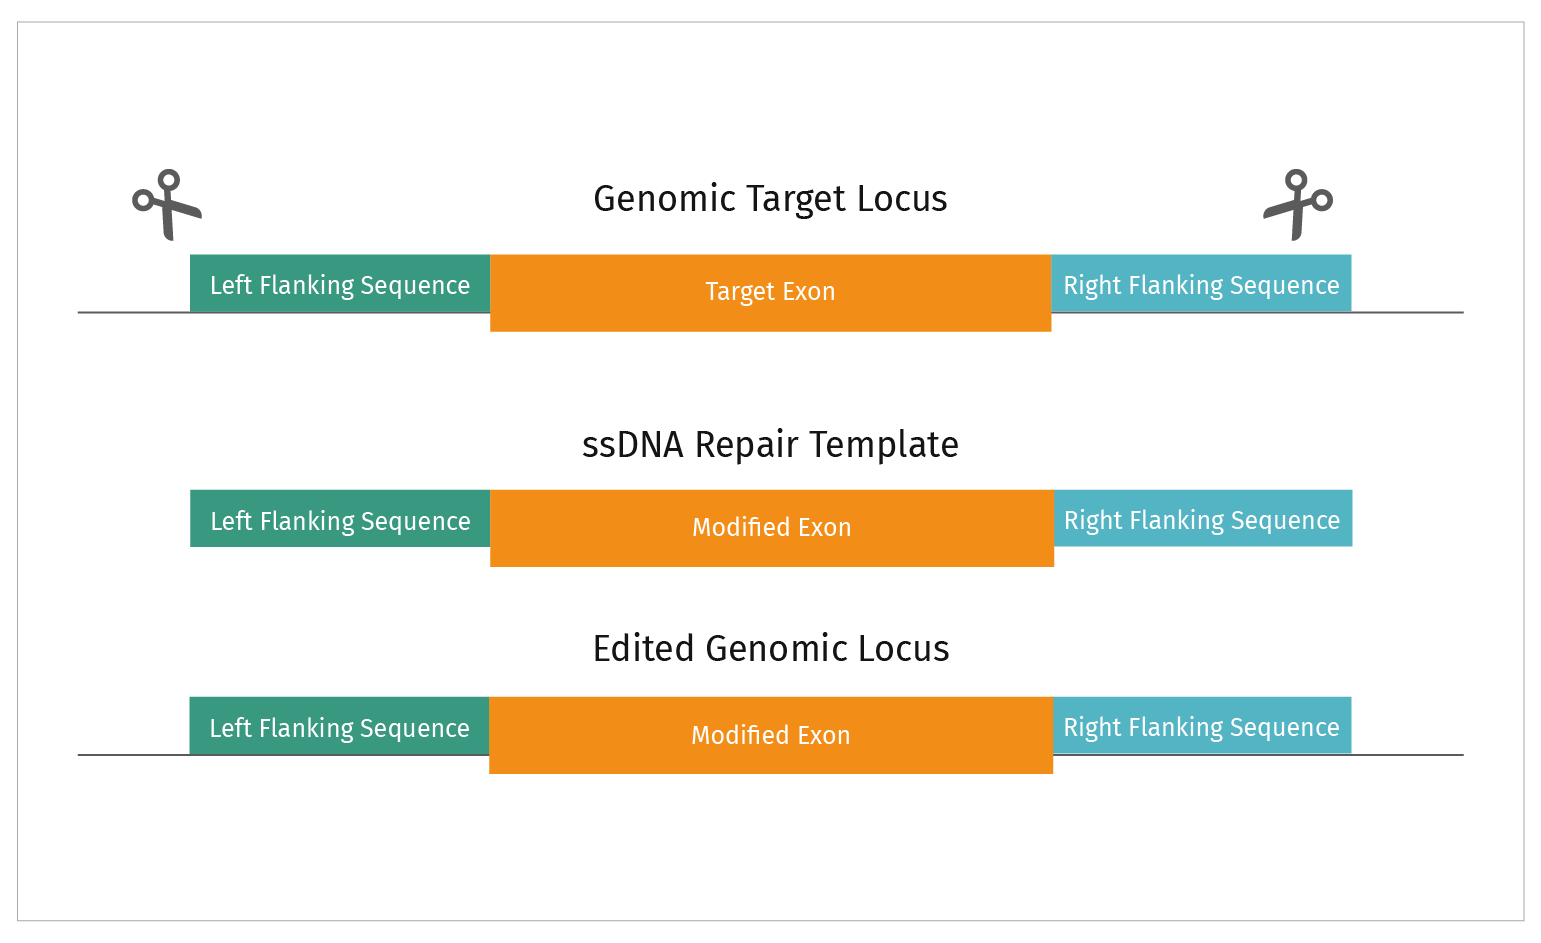
If your desired genome edit is modest in size, you can provide a repair template in the form of a single-stranded oligo DNA nucleotide (ssODN). Different manufacturers provide different guidelines for their design, but they typically range from 80 nucleotides to 200 nucleotides. A repair template of this size will be limited in the types of edits it can accommodate.
The PAM site should be centered in the ssODN with accompanying nucleotide changes close to the PAM. Your mutations should include mutations that disrupt the PAM site so that after successful repair, your edit is no longer susceptible to Cas9 cleavage.
Genome edits > 200 nucleotides in length
Molecular Cloning
If you desire to knock in or knock out larger pieces of a gene, then you must design and possibly build a repair template as a molecular clone. Traditionally we think of building this type of construct with standard lab cloning techniques. If you build a construct this way, you should include homology arms in your repair template of up to 800 base pairs in length. Avoid including repeat sequences in the arms. SnapGene’s cloning simulation tools found in the Actions Menu, allow you to appropriately design and predict the outcome of your cloning strategy in the context of your molecular reagents.
Synthetic DNA molecules
Long single-stranded DNA (ssDNA, lssDNA or megamers) can be synthesized and sequence verified with lengths now extending to 2000 nucleotides. Recommendations for homology arms range from 100 to 400 nucleotides. Efficient genome editing with 1000 bp lssDNA that included only 100 nucleotide homology arms has been reported. One of the keys to this successful genome edit targeting a double-stranded break for each end of the repair template.
SnapGene Workflow
Simple gene disruption
Simple gene disruption is a CRISPR edit with no repair template, introducing two or more double-stranded breaks into your target genome. This increases the likelihood of gene disruption, but because the repair is still dependent on NHEJ, the outcome is random.
1. Design your gRNA
2. Obtain your gRNA
Fully synthesized gRNA can be ordered from one of many companies. These companies will provide you with details on how to convert your DNA sequence to create the correct gRNA or sgRNA.
Alternatively, you can inducibly express your gRNA from a CRISPR plasmid. These constructs are easily made with a non-restriction-based cloning technique such as In-Fusion or Gibson Hi-Fidelity cloning. Both of these techniques can be planned in SnapGene.
3. Introduction of CRISPR reagents into your system, using best practices for your system.
4. Appropriate selection and screening of candidate genome edits.
5. Verification of your genome edit.
When performing non-templated genome editing, you need to verify that your edit occurred, determine the exact change that you introduced, and establish whether your edit is homozygous or not.
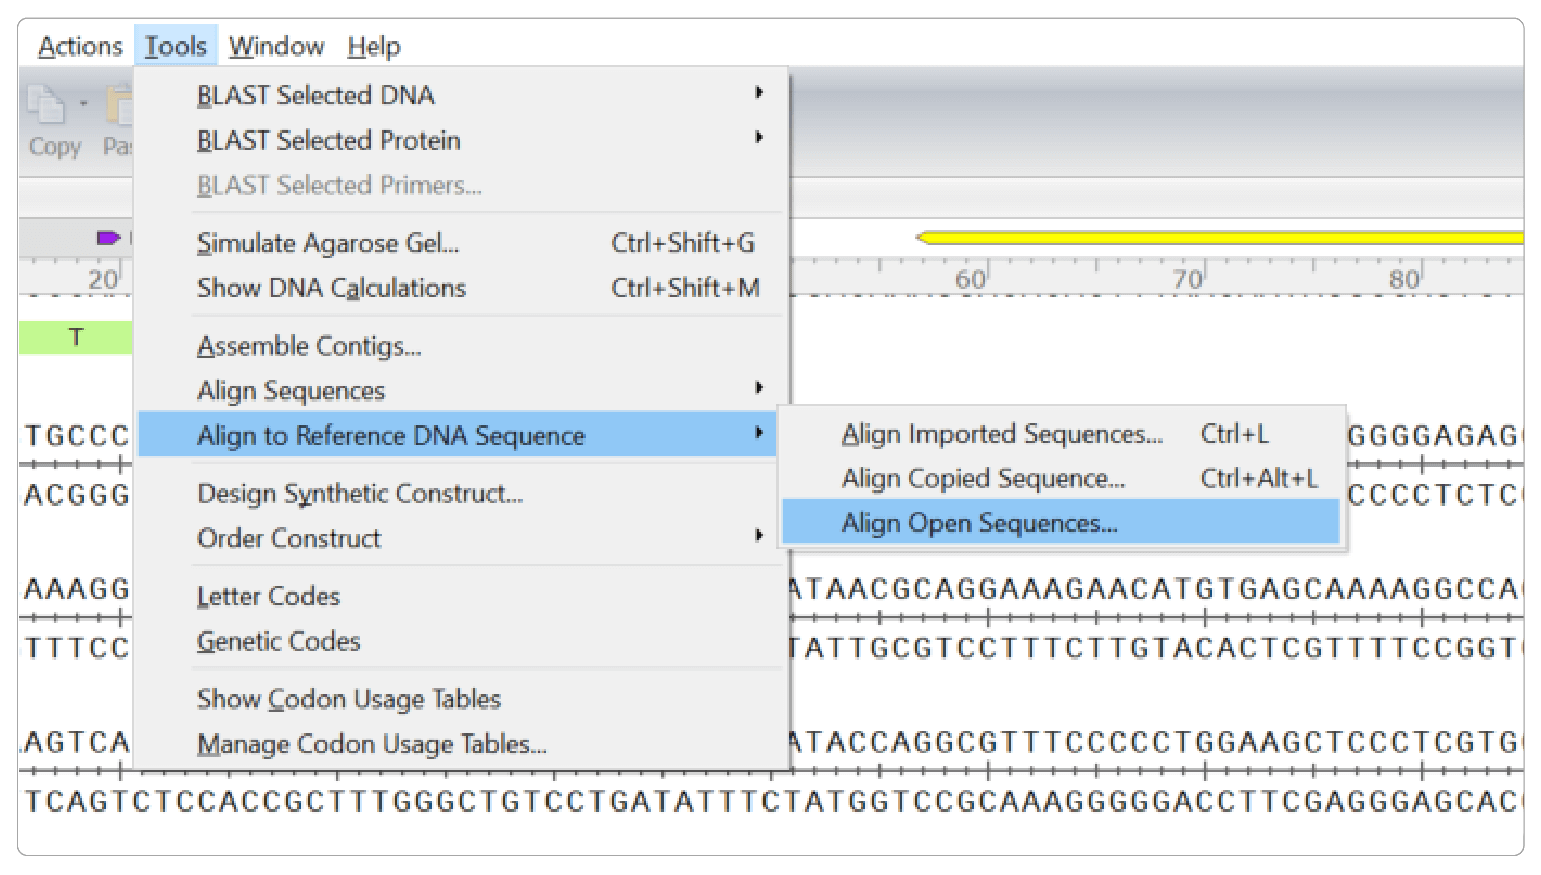
You can easily validate your edit by sequencing your target region and comparing the results to your original sequence in SnapGene using the Align to Reference DNA Sequence tool.
To be more comprehensive in evaluating potential off-target damage, there are several techniques available that can scan the genome for mismatches created by InDels including CIRCLE-Seq and GUIDE-Seq. They vary in sensitivity and specificity, and no one technique is 100% conclusive. For absolute certainty, you will need to complete whole-genome sequencing.
FAQs
What is the minimum I need to do CRISPR?
- You need a gene of interest and the desired edit
- You need to find PAM sites in that gene near your desired edit
- Adjacent to the PAM sites, you will identify your “protospacer” aka gRNA sequence
- When using Cas9 your PAM site is a short 5’-NGG sequence
- After you identify your gRNA, you can purchase purified Cas9 that is premixed with your gRNA
- Deliver CRISPR mixture to your cells. After an appropriate incubation time expand your cells and screen for mutants

Does my gRNA/gDNA include the PAM site?
No. You do not need to include the PAM site in your synthesized or expressed gRNA. You must be sure that there is an intact PAM present in your target sequence adjacent to the gRNA target.
Where in the gRNA/gDNA will Cas9 cut?
Cas9 will cut the DNA target defined by your gRNA three to four nucleotides 5’ of the PAM site (located in your target DNA).
If there are additional PAM sites near my gRNA target, will they trigger off-target cleavage?
As a general rule, no. PAM sites, defined as NGG, are quite common within any genome. Cleavage specificity is determined by the juxtaposition of your specific target to an NGG site. If there is some redundancy in the region you are trying to edit, you may be at higher risk for off-site cleavage. If this is a particular problem, you may wish to explore an alternate Cas protein that uses a larger less common PAM site.
How close does my double-stranded break need to be to my edit?
This depends in part on the outcome of your genome edit. If you are simply using the gRNA to disrupt a gene, then the cut is essentially the edit. The DNA damage will induce the error-prone repair pathway, NHEJ. If you have two PAM sites within close proximity you could consider making two gRNAs to ensure that your NHEJ repair has minimal background.
As a general rule, your repair template should initiate repair within 10 basepairs of the cleavage site. Repair efficiency drops as the distance between the cleavage and the repair increases.
How much concern should I give to off-target cleavage?
There are no absolute answers to this question. When possible you should avoid off-target cleavage, through the judicious selection of gRNA. Particularly if you just want to disrupt gene function, and have multiple gRNAs to choose from. However, some genome edits, such as a point mutation, provide few degrees of freedom. In some situations, your gRNA might target off-target cleavage, but your repair template will lack sufficient homology to direct an off-target repair. The use of a Cas9 nickase will minimize off-target damage. The Cas9 nickases only cut one strand but can still target a genome edit. However, an off-target nick, relative to a double-stranded break, is easier to accurately repair. There are also modified Cas9 proteins that offer higher specificity than wild type.
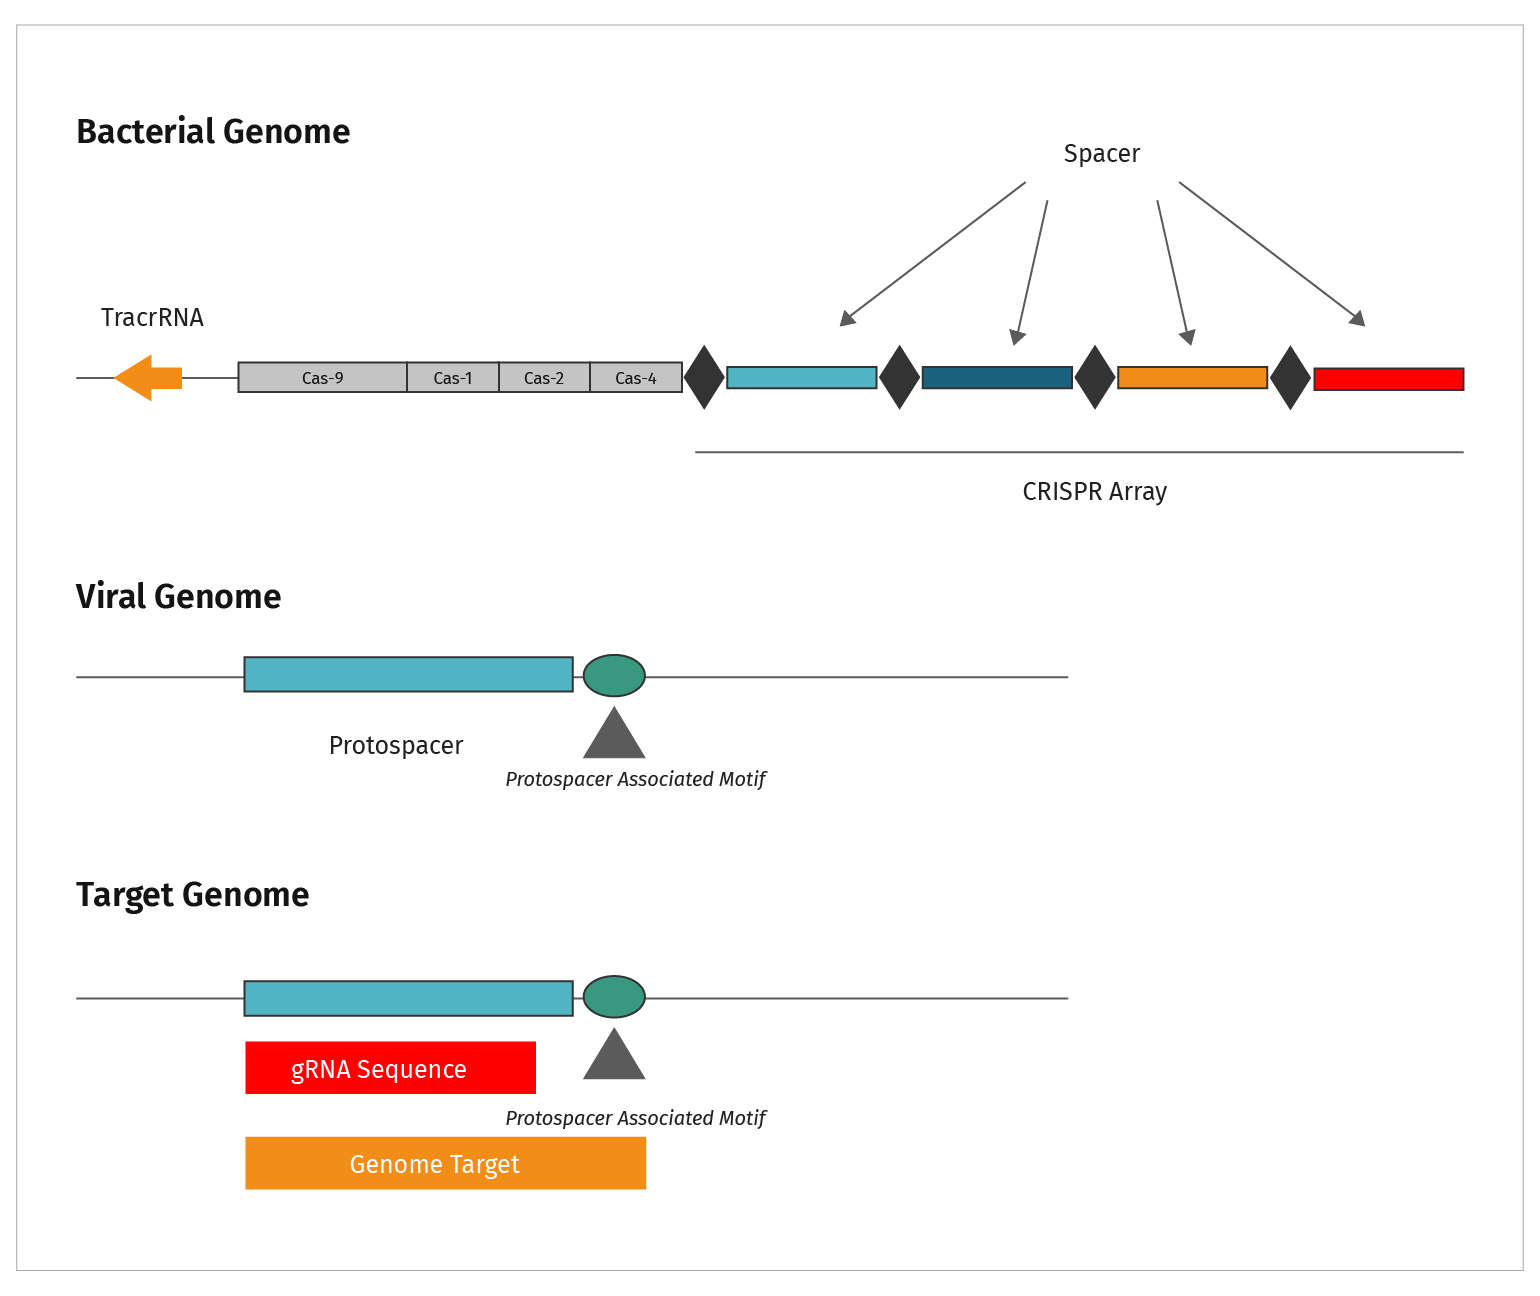
The terminology is confusing. What is the difference between a target sequence and a protospacer?
This figure summarizes the sequence types discussed in CRISPR.
- CRISPRs are the repeat elements found in bacterial genomes
- The CRISPR elements are separated by spacer sequences
- Genetic analysis identified the source of spacer sequences in viral genomes, hence they were labeled “protospacers”
- Short nucleotide motifs were identified adjacent to protospacers. These sequences acquired the name Protospacer Adjacent Motif, or PAM sequence
- The genomic target is functionally analogous to the viral target. Both require a PAM sequence adjacent to the gRNA homologous region in order to be cut
More Resources
► Download CRISPR Plasmids
Online tools for CRISPR design

